Notes on Getting AVRDUDE to work.
IMPORTANT!
This page is under construction. Please don't use for reference yet!
Here are some pointers on how to get avrdude to work. Some of them are troubleshooting tips and operating guidelines. Others are little tricks to make avrdude more useful. I hope you find them helpful.
- Minimum Avrdude Command Line and Connections
- Use -B 255 to Read Slow Chips
- Use Avrdude to Identify Your AVR Microcontroller and Read the Fuses
Minimum Avrdude Command Line and Connections
At the very least, your programmer needs to be properly wired to the AVR microcontroller and the microcontroller must be powered. Usually you can power the chip from the programmer VCC and GND lines.
In addition, when running avrdude, at the very least you need to specify the programmer and an AVR microcontroller part number. Some other items might be required depending on the particular setup.
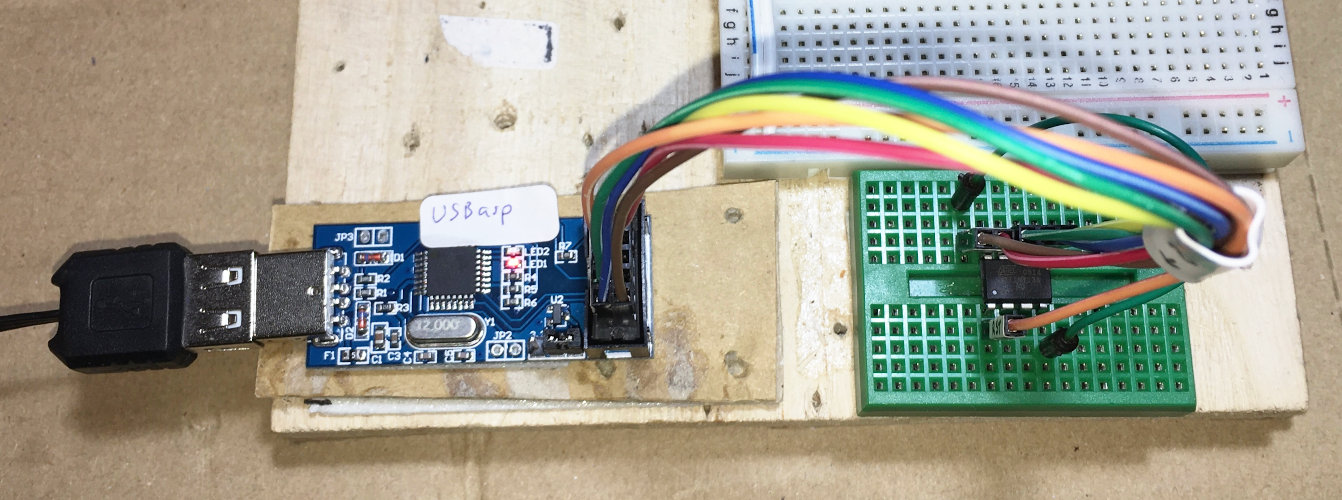
Here is a minimalist example of a USBASP programmer and an ATTINY13 (Tiny13) microcontroller.
Wiring:
From the USBASP programmer, the MOSI, MISO, SCK, RST (Reset), GND, 5V all are connected to those same pins on the Tiny13.
Command Line:
avrdude -c usbasp -p t13
Here is what linux terminal output looks like:
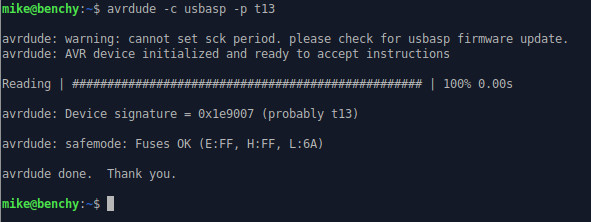
Note that the warning results from old firmware in the USBASP programmer. It is possible to update the firmware on these programmers. In any case, the warning doesn't necessarily mean anything is wrong.
Here are some other command lines with different programmers. These all specify "m328" which is an ATMEGA328, like the one found in most Arduinos.
Using a tinyusb programmer:
avrdude -c usbtiny -p m328
Using a Pololu programmer:
avrdude -c usbispv2 -P /dev/ttyACSM0 -p m328
For the usbispv2 series of programmers, Avrdude needs to know which com port the programmer is attached to. This is specified by the -P option. In linux, the port will likely be /dev/ttyACSM0 or /dev/ttyACSM1.
Using a serial (FTDI/CH403) programmer:
avrdude -c arduino -P /dev/ttyUSB0 -p m328
This is sort of a special case where the AVR microcontroller has a bootloader installed and will communicate with Avrdude via the serial port. This method of programming does not use the ISP/SPI MOSI, MISO, and SCK lines. The wiring is as follows:
- There is a 10k resistor between the AVR microcontroller (AVR) reset pin and 5V.
- There is a 10 nF capacitor between the AVR reset pin and the serial port DTR pin.
- The serial port RX pin goes to the AVR TX pin.
- The serial port TX pin goes to the AVR RX pin.
- The 5V and GND pins on the serial port connect to VCC and GND on the AVR.
Back to Top
Use -B 255 to Read Slow Chips
The clock used for programming timing is set by the computer, not the microcontroller. This timing is refered to as "bitrate", meaning the speed at which bits of data travel between the programmer and the microcontroller. And a "bit clock" is used to control the bitrate. If the microcontroller speed is too slow, it won't be able to keep up with the programming clock used by the computer. The "-B" option allows you to slow down the bit clock by padding it with extra space (time), giving slower microcontrollers enough time to respond to programming data.
In many cases, and certainly chips that are operating at 8 Mhz or faster, the programmer can talk to the chip using the default bit clock setting. But for chips that are set for internal clock speeds below 1 MHz, or programmers that have a high fast clock set in the firmware, the programmer may fail to communicate with the chip using the default setting. "-B 255" specifies the slowest bit clock (by offering the most padding of the clock signal). This guarantees the clock is slow enough to program even the very slowest chips. It's what you need to check unknown chips that have been sitting in a box for a while!
Once you programmer is talking to the chip, you can check the fuse settings and operate the chip at an appropriate speed. Normally you wouldn't want to use the -B 255 setting while programming normal faster chips because it would make programming veeeerrry sloooow. But for simply verifying the chip and fuse settings, you won't even notice the delay. And it ensures that even chips with fuses set for the slowest internal 16 kHz clocks can be read. So from now on, I will specify this option on the command line when performing debugging actions.
NOTE: When using older models of the very popular USBASP programmer, Avrdude will generate a warning:
avrdude: warning: cannot set sck period. please check for usbasp firmware update.
This means that the USBASP programmer firmware is not able to modify the clock speed. So these programmers will not be able to program chips which have fuse settings set to the lowest speeds. It can give the impression that your microcontroller is bad, even though it just needs a slower bit-clock to be programmed. In such cases, either update the firmware on your USBASP programmer or use another programmer.
Back to Top
Use Avrdude to Identify your AVR Microcontroller and Read the Fuses
Here's what happens if you specify an AVR chip that is different from the one plugged in. In this case, the same Tiny13 is plugged in, but a different chip (ATTINY2313) is specified on the command line:
Command Line:
avrdude -B 255 -c usbasp -p t2313
Here is the output:
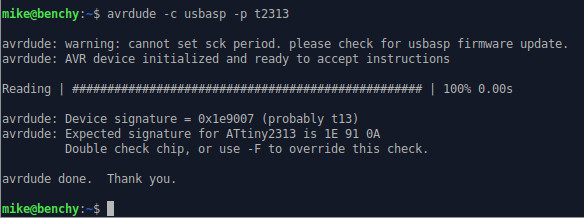
Not only did avrdude notice that the chip was wrong, but it identified the chip that was plugged in. So if those markings get too hard to read, there is another way to identify your chips!
Take a look at the command line output under the Minimum Avrdude Command Line and Connections section above. Notice that when the chip was properly specified on the command line, the fuse settings of the chip were displayed. This only happens when the chip is properly specified in the command line, but not when a different chip was hooked up. The key takeaway here is that even if there were no markings on the AVR, you can generally at least identify the chip. And with that, you can correctly identify the chip in the command line in order to easily read the fuse settings. This is often super useful!
From the command line:
avrdude -c usbtiny -p m238